There aren’t many jobs that pay as well as plumbing does. Plus, it’s an in-demand trade that offers real job security over the long term.
So, what does it take to become a plumber? In this blog post, we’ll discuss the qualifications, training, and experience you need to start a successful career in plumbing. For professional help, you can contact Plumber Georgetown KY.
The most common cause of a leaky faucet is worn-out washers or O-rings. These are simple components that, if replaced, can prevent dripping and leaks. Identifying the source of the problem and taking action can help you avoid expensive, unplanned repairs.
Before you start working on the faucet, turn off the water supply line at the valve under the sink. Then, plug the sink drain with a piece of rag or rubber band. This will trap the dripping water and make it easier to work on the faucet without getting wet.
Shut off the water supply line from under the sink, too, to prevent backflow and possible flooding of your kitchen or bathroom. After the water is completely shut off, use a wrench to loosen the set screw on the side or back of the faucet handle. Usually, this is a standard flathead screw, but it could be a hex screw. Once the screw is removed, the handle will likely come off with a little gentle prying or banging. Be careful not to break the decorative cap on the top of the handle or the handle itself.
On the underside of the faucet, you’ll find anywhere from 1-4 nuts that need unscrewing to release the faucet (and handles, if applicable). It’s easiest to do this while laying on your back with a bucket under the faucet.
Once the nut is off, you can remove and replace the O-ring on the stem. The O-ring is often the culprit of leaking faucet handles, and it can be easily replaced with one the same size that’s been lubricated with nontoxic, heat-proof plumber’s grease. You’ll also need to replace the seat washer on the bottom of the stem, as it may be pitted from age and water exposure.
Reassemble the faucet, replacing any decorative caps and the handle. Be sure to tighten the stem nut and packing nut securely and carefully. Check for a new washer or O-ring, and install it as necessary. Be careful not to overtighten, as this could damage the faucet assembly and lead to leaks. If you’re having trouble putting the faucet back together, it’s a good idea to take pictures of each part before removing it for reference.
Leaking Faucets
A leaking faucet can be more than just an annoying nuisance. Over time, it can lead to water damage and higher than normal utility bills. In some cases, a leaking faucet may be indicative of broken pipes or fittings that need to be replaced. This is a job for a professional plumber, who can ensure the problem is fixed properly and that other issues do not arise.
The most common cause of a leaky faucet is a worn-out O-ring or washer. These are small rubber or metal pieces that seal gaps in the internal parts of your faucet to prevent water from escaping and damaging the plumbing system. If you notice that your faucet is leaking from underneath the handle, it may be time to replace these components.
Another common cause of a leaking faucet is corrosion of the valve seat. This little connector sits between the faucet body and spout and is susceptible to mineral deposits and corrosion that can lead to a leak. Cleaning this component regularly can help prevent corrosion and a leaky faucet.
Leaks from the spout can also be caused by a worn-out gasket. This is a thin rubber ring that fits around the base of the spout and can become hard or brittle over time. If the spout is leaking from this area, replacing the gasket is a simple and inexpensive fix that can stop the annoying drip.
Many homeowners can diagnose and repair basic leaking faucets, but some repairs require the expertise of a professional. If you’re experiencing a leaky faucet in your home, contact Frontdoor to chat with an Expert in your area and get a list of vetted, local Pros.
Before you begin working on a leaky faucet, it’s important to shut off the water supply valves in your home. You can usually find these in the cabinet beneath your sink, but if not, check your home’s main water valve to see where the supply lines connect to it. Once the water is shut off, open the hot and cold valves to drain any existing water.
Dripping Faucets
The sound of a dripping faucet can be annoying, but it also wastes water and raises utility bills. Homeowners can sometimes fix a dripping faucet themselves by following simple steps, but more complex problems may require the help of an expert plumber.
A professional plumber can also help homeowners lower their utility bills by identifying faulty water outlets and replacing them with more efficient models. Faulty water outlets can often be found in the kitchen, bathroom and laundry room. The problem can also extend to other areas of the house if the faulty outlet is close to pipes that run through uninsulated areas like attics or basements.
If a home’s plumbing is older and the pipes are corroded, a leaky faucet can be a sign of more serious issues. Water that drips from corroded pipes can lead to water damage in the walls and ceilings, as well as mold growth. If a homeowner suspects this is the case, it is important to have the pipes and fixtures checked by a professional plumber before they are damaged further.
The simplest reason for a dripping faucet is that one of the parts in the mechanism has worn out or become loose. This can happen over time or as a result of a problem with the water supply, such as hard water that contains mineral deposits. In these cases, the plumber may be able to replace the part to stop the drip and restore water flow.
In more complicated cases, a dripping faucet could be the result of high water pressure. If the dripping only happens at certain times or when the handles are moved a specific way, it could indicate that there is too much water pressure. A plumber can check the pressure and adjust the regulator if necessary.
Another common cause of a dripping faucet is that the washers are worn out or incorrectly installed. Over time, the washers rest against the valve seat and wear down due to friction. A plumber can replace the washers and ensure they are correctly installed to prevent future leaking.
Faucet Repair
Faucets are usually sturdy and reliable, but like anything else, they can eventually wear out. Whether you have relatively new faucets that are still in good shape or special vintage or antique ones that you love, a repair can save them and give you years of trouble-free service. Fortunately, faucets are easy to disassemble and reassemble, even for the inexperienced DIYer. A repair kit can help you get the job done, but you can also find parts at your local hardware store or plumbing supply specialist.
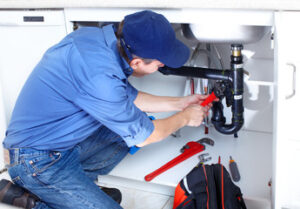
Start by shutting off the water supply valve under the sink to prevent flooding during the repair process. Next, remove the faucet handles by loosening the screws that hold them. These are typically standard flathead screws, but if your faucet is older, you may need to use a hex screwdriver or hex wrench instead. If the handles seem to be seized, try applying penetrating oil to help you loosen them.
Once the handles are removed, you should be able to see the stem nut holding the faucet’s stem in place. Fit a wrench to this nut and turn it counterclockwise until it is loose. Remove the nut and the stem from the handle, then inspect it for damage. If the stem is cracked or pitted, you’ll need to replace it. You’ll also want to replace the O-ring that seals the seat washer and stem.
Before reassembling your faucet, it’s a good idea to clean the valve seat and other surfaces under the sink. A corroded or obstructed valve seat can cause problems with your water flow and even lead to leaks. Pouring white vinegar over the valve seat can help dissolve mineral buildup and restore the seal.
Reassemble your faucet by following the order of reassembly in the owner’s manual or on the packaging for your particular model. Then test it by turning on the water and watching for drips. If you notice a drip, turn off the water and re-tighten the nut on the stem if necessary. Finally, rub a bit of petroleum jelly on the threads of the bottom stem nut and screw it back into place.