Stucco Repair is an essential residential service that can enhance the beauty and value of your home. Learn about what to consider and how to best execute this project.
The first step of this process is to inspect the stucco and identify any damage. Chisel any loose areas and wash the surface to ensure a clean base for the new material. Contact Stucco Repair Philadelphia now!
Stucco is a beautiful and durable material that improves the longevity of your home if it’s properly maintained. However, like any exterior material, stucco can experience damage over time from weather and other environmental factors. Identifying and addressing these signs of damage as soon as possible will prevent further complications, such as structural damage and health risks like mold.
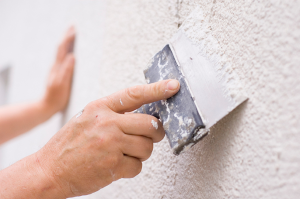
The first step in any stucco repair project is to clean and prep the damaged area. Using a wire brush, remove any loose debris or dirt and wash the area thoroughly to ensure proper adhesion for your new stucco. If the area has sustained significant water damage, a thorough cleaning and drying process is required before proceeding.
Hairline cracks are the most common sign of stucco damage, and they can be easily repaired with joint compound. However, if the cracks extend deeper into the structure, re-stuccoing may be required.
Other damage indicators include abrasions and discoloration. These can be caused by a variety of issues, including the use of non-stucco products or simply wear and tear from the elements. If you notice any of these signs, it’s best to contact a professional.
For holes and cracks, the same repair technique applies. Thoroughly clean the area and apply a bonding agent to ensure proper adhesion of your new stucco. Then, fill the hole or crack with stucco mix and press firmly to ensure no air pockets are present. Finally, smooth and texture the surface to match the surrounding stucco.
Water damage is one of the biggest causes of stucco damage, and it can lead to a number of other issues, including mold and mildew. It’s important to address the cause of the moisture intrusion rather than just treating the symptoms.
Water-damaged stucco also tends to become brittle and prone to further damage. It’s therefore essential to install a proper waterproofing system in addition to any repairs or replacements to your stucco. For this, a high-quality caulking product will be needed to effectively seal and protect the stucco from the elements.
Sealing
Whether from wind or rain, the first step in addressing stucco damage is to examine both the surface and the depth of the problem. In addition to a visual inspection, moisture tests can also help, particularly with deeper damage. For example, if the stucco is moist to the touch and has visible mold or mildew, a moisture meter can confirm that the problem is not simply superficial but has penetrated the brown coat or even lath (the mesh framework onto which stucco is applied).
Repair or Remediation
Once the damaged area has been repaired, the next step is to seal it. A quality stucco sealant can greatly enhance the durability of your stucco, especially in wet climates. Choose a product that is designed for stucco and follow the manufacturer’s instructions for application.
When you’re finished, allow the sealant to dry completely (typically within a few days). Then, perform a walk-through to verify that the work meets your standards.
For Cracks and Small Holes
Once you’ve determined the extent of your stucco repairs, it’s time to apply the finish coat. During this process, it’s important to remember that patience is key. It may take a few weeks for the final coat to fully cure, so be sure to keep it protected from rain and direct sunlight until then.
During the patching and curing processes, it’s also important to keep in mind that the repair materials should match the texture of your stucco as closely as possible. If the new material is significantly different in color or texture, it will be apparent and will not look natural.
For cracks, begin by wire-brushing the affected areas and wetting them with bonding liquid. Then, use a cold chisel to undercut the bottom of each crack, widening them slightly and making it easier to “key in” the new stucco.
Then, cut a piece of fresh lath slightly larger than the hole and install it using galvanized nails or screws. Make sure to firmly attach it to the existing wall, securing it tightly in all corners and at the top and bottom of each wall. Then mix your stucco mud—following the package directions and aiming for a consistency similar to peanut butter—and spread a 1/4-inch layer over the lath.
Patching
Whether the repair is for small holes, cracks, or other damage to the exterior of your home or business, patching requires a careful approach. The wrong material can result in more costly damage to the structural integrity of your building. It is important to understand what you are getting into before attempting a DIY stucco project. Choosing the right patching material for your needs and understanding the process can help you save time and money while maintaining the beauty of your property.
The first step in the stucco repair process is to clean the area thoroughly to ensure a good bond with the new material. Use a wire brush to remove any loose particles, and then dampen the area slightly with water to help prevent further moisture intrusion. In the case of large holes, a piece of metal lath may need to be cut and secured to the structure to provide a strong base for the new stucco application.
After the damaged area has been cleaned and inspected for underlying issues, it is time to begin the patching process. First, select a stucco patching compound that is compatible with the existing surface. A standard cement-based patching compound works well with traditional stucco, while a specialized EIFS product may be needed to repair damaged areas of an EIFS system.
Mix the stucco patching compound according to the manufacturer’s instructions. This material dries quickly, so it is important to only mix enough for the amount of time that you need it. In the case of a larger hole, it is often necessary to apply the patching material in several layers. It is important to allow the patching material to dry completely between each layer.
Once the patching has been completed, it is important to protect the area from sun and wind until it has cured. This can be done by covering the patched area with a tarp or shade. It is also recommended to occasionally mist the patched area with water to slow drying and improve the strength of the final result.
Once the patched area has cured, it can be painted to match the surrounding texture. This step is essential to maintain the aesthetics of your exterior surfaces, as it helps the repaired areas blend seamlessly with the existing stucco.
Painting
The final step in a stucco repair is painting the damaged area to ensure that it blends seamlessly with its surroundings. In addition to improving the appearance, it will also protect the stucco from further damage by locking out moisture and other environmental contaminants.
Before proceeding with any paint application, it’s important to make sure that the repaired area has dried completely. To check this, place a clear piece of plastic wrap over the surface and press gently. If it fogs up, the stucco has not fully dried and may require further time to cure. It’s also a good idea to keep the repaired area protected from extreme weather conditions while it’s curing, as cold temperatures or direct sunlight can ruin newly applied stucco. In some climates, moist curing may be a useful technique, which involves periodically misting the stucco to prevent it from drying too quickly.
While it’s possible to perform small repairs yourself, more extensive damage may be best handled by a professional. A stucco remediation contractor will be able to assess the severity of your problem and recommend a suitable repair method.
Moisture Damage
Moisture damage to your stucco can be difficult to detect, but it’s essential to address it as soon as you notice any symptoms. These signs include musty odors, discoloration, and bubbling or blistering. If you see these warning signs, it’s likely that water is leaking behind the stucco and causing damage. If the moisture isn’t addressed, you could face costly structural damage to your home.
Mold Damage
Mold growth is another common cause of stucco damage, and it’s often a sign that there’s a leak in the waterproof layer. This is a big problem because it can damage the entire house structure and lead to serious health issues for you and your family. Mold often occurs as a result of water entering the stucco through cracks or holes.
The most effective way to treat mold and water damage in your stucco is by performing a full remediation. Remediation is more expensive than simple repairs, but it will address the underlying problems that are causing your stucco to deteriorate.